|
The
Schools Marine Challenge is currently working with
schools in the South West of England... if you are a
Headteacher, teacher, or governor interested in becoming
involved with the Challenge, you can get more details by
e-mailing Nikki
Pascoe at
the British Marine Federation.
The
www.schoolsmarine.com
web site is dedicated to the Schools Marine Challenge,
now in it's third year. The Challenge provides an
excellent opportunity for schools in the South West of
England to take part in an innovative practical design
challenge. Their web site is designed to support
students and teachers as they tackle the task of
constructing working vessels, and is a useful resource,
for all pupils across the UK, hence we include it on our
website.

ALL
CONTENDERS PLEASE NOTE: Race Day 2006 will take place on
Tuesday 4th July at Roadford Lake. Put it in your
diary now!
News
: Curriculum
: Hints
& Tips : Schools
: Dates
: Gallery
The
following links to various guidance sheets are relevant
to curriculum target areas at Key Stages 3 and 4 as
well as GCSE Engineering units:-
Rules
- Make sure you check out the rules before
getting too involved with your craft. It's a
good idea to print these out and keep them handy
so you can refer to them to make sure your entry
is within the rules!
Points
Criteria - Examine this document carefully to work out
how you can achieve maximum points for your
entry
Hull
Design: Electric and IC - The hull is the most important part of your
craft and will dictate your success or otherwise
within the Challenge. Our guidance sheet will
help you through the steps you need to take to
ensure you arrive at Race Day with a fighting
chance. Combined with the information in our
Hints & Tips section, this is an essential
read for all
Hull
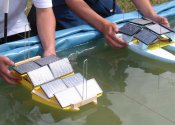
Design: Solar - The Solar Challenge offers great scope for
the design of different hull types for your
craft. Performance and handling, as well as form
and buoyancy are all reliant on your hull
design. This guidance will help you to consider
many of the options open to you.
Graphic
Products - In the modern world of sports marketing,
adopting and promoting your team identity is an
essential part of your work. You will need to
reward your sponsors with appropriate
advertising and give potential sponsors a reason
for working with you. This guidance sheet will
help you to organise your promotional campaign
Solar Craft
Guidance Notes
Design
your boat using either CAD
or hand drawn to generate Hull form. You
can print to paper to create hull line drawings
for templates, or export as CNC code.
Produce your hull from suitable modeling
material. Styrofoam, or closed cell
polyurethane foams are good. This may be used directly to mount solar panels
and propulsion system, however it would be
better to produce a shell hull, which is lighter
and not prone to water-logging.
Vacuum forming the hull directly over the
former; if using styrofoam use a release film
or paint a heat resisting surface, such as a
water based paint system. When installing
your power-train, ensure good
alignment of motor and propshaft

Top
Tips for your Solar Team - The Solar
Advantage
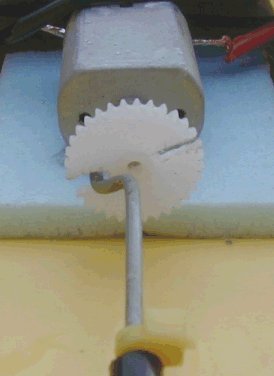
Coupling:
We suspect this is the key to the
outstanding performance we saw taking place. A
close up photo reveals that the alignment of
the shaft was achieved by having an adjustable
angle on the prop and motor interface. Any
friction here wastes loads of power.
Shaft: Friction busting bearing
surfaces to stop the prop shaft sliding down the
tube seem to have been simply made by using more
of the standard tube with a cable tie cut off!
Prop:
Try changing from prop to prop and then
running against the clock. Is there any
significant difference between standard (orange
surface piercing) and the more usual red propellers. You
will probably find one prop is smoother running.
If you do, that prop is probably best suited to your
hull energy requirements.
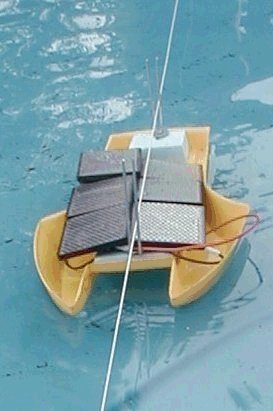
Motor
details: Standard Low Inertia
Solar
Panels: Standard x 6 wire in series
Times over a distance of
10 metres
|
Bright Sunlight
|
1.45 m/sec
|
Sunlight
|
0.9 m/sec
|
Daylight
|
0.36 m/sec
|
Failing light
|
0.24 m/sec
|
Hull:
Design on a larger scale than Solar either as a vacuum
forming or as an entry composite project from a mould
and pattern. Alternatively you can request one to get
you going, however you would not gain as many points
available for the hull design section of the
competition.
Powertrain: Make sure you have a coupling to
the prop shaft that does not waste valuable power, make
one that keeps the motor and prop shaft in perfect
alignment. Our prototype used a brass rod drilled and
tapped. Fix the motor so that you can adjust its angle
slightly. A popular method is using an aluminium plate
that can be bent slightly and slots for the screw holes
in the motor.
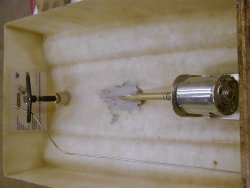
Layout:
Balance your boat; you do not want heavy bows! Motor mounting
tip: ONLY USE SHORT SCREWS MAXIMUM
LENGTH 6MM. Longer screws will catch the motor
armature!
Radio gear can use the same power supply as the
motor. Keep in a watertight compartment.
Battery:
Quick
access to this will be required on Race Day so make
access easy.
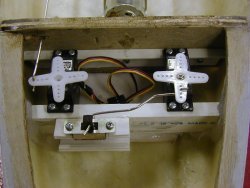
Speed controller: You don’t really need one
as you will be going flat out all the time. A slide
switch can be linked to the servo to give forward and
reverse, but even that may be a luxury
Build
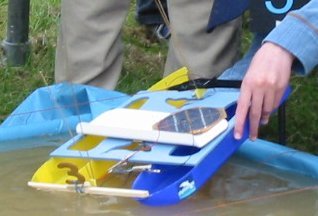
Your Own Solar Test Tank
One
of the problems with testing your craft is finding a
suitable place to put your boat
through
it's paces. If the staff-room kitchen sink is too small
why not consider constructing your own testing tank.
It's not as difficult as it might seem, as long as you
keep it to a realistic size and bear a number of things
in mind!
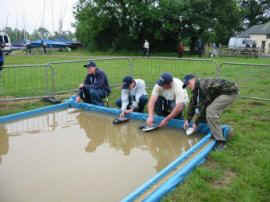
-
is there a suitable level surface available?
- what size will allow for meaningful testing?
- how will the tank be filled?
- how will the tank be emptied?
- are you able to assemble and disassemble quickly
at the end of the school day?
- what health and safety impications are involved?
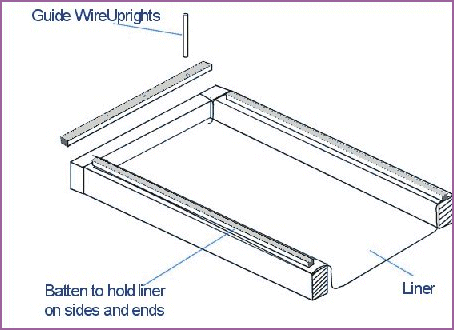
The
tank we will be using for the Solar challenge can be
easily constructed from cheap materials to give you
plenty of opportunity for dynamic testing.
Basic materials are: 12’
Fence rails, Builder polythene sheeting (damp proof
membrane available from stores such as Wickes)
Use
the drawing and photograph as a guide. Beware of
constructing something too large as it will hold a
considerable volume of water. Design and calculate your
tank before becoming too ambitious!
The
image below shows the cross section through the tank.
The corners of the tank have to be reinforced and
mechanically fixed (screwed together) to take the
pressure of the water in the tank. Although this is only
shallow there is enough pressure to push the corners out
if they are not secured fully.
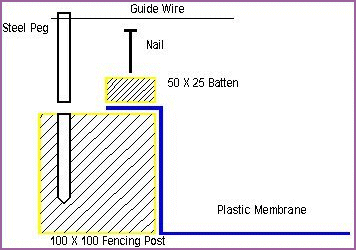
You can use this method to make a simple test tank that
can be of any length or breadth to test your craft
in. Make sure
that the area that you use is free of sharp objects so
that you do not puncture your liner.
School
Teams: Let us know how you get on. You can e-mail us
some pictures of your pool. You could even hold your own
Solar Challenge prior to Race Day to decide which boat
will represent your school.
Marine
Challenge Schools 2004/5
The
following schools are entered in the 3rd Schools Marine
Challenge. Don't forget to send us reports on your
progress; photos of your team and your craft, team
diaries, news of sponsorhip arrangements etc.
Publicising your work is an important part of the
Challenge. You can e-mail items for your school page via
info@schoolsmarine.com.
|
All Saints
Church of England School, Weymouth
Brixham Community College
Budmouth Technology College, Weymouth
Colyton Grammar School
Coombe Dean School, Plymouth
Great Torrington Community School
Hele's School, Plymouth
Helston School and Community College
Holsworthy Community College
Ivybridge Community College
Kingsbridge Community College
|
Launceston
College
Lipson Community College, Plymouth
Liskeard School and Community College
Newquay Tretherras School
Notre Dame RC School, Plymouth
Oakmead College of Technology, Bournemouth
Pilton Community College
St Boniface's RC College, Plymouth
Teignmouth Community College
The King's School, Ottery St Mary
West Exe Technology College
|
Electric Charger
The battery charger is as essential to the electric
challenge as petrol is to the internal combustion one.
You can buy a charger but they can be
expensive or you can put together a simple electronics
project to make your own for less than £1.50p
A Charging Circuit
Charging batteries from a 12volt car battery to the
7.2volt 6 cell battery pack is relatively straight
forward.
The theory is as follows: -
The rating for the 6 cell battery is 13000mAh
therefore to charge the battery in 1/2hr; the current
flow has to be 2.6Amps. (1.3 x 2 = 2.6)
The circuit has to lose approx. 4.8V
The battery is 1.2volts per cell, 6 cells = 7.2V [12
– 7.2 = 4.8]
Therefore, using Ohms law:-
V/I=R 4.8 / 2.6 = 1.85 Ohms
If
we use a 1 Ohm resistor the power required is: V x I =
W (4.8x2.6= approx. 12.5Watts)
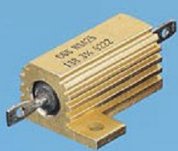
The resistor we recommend is rated at 25Watts so
running this component at half its rating will ensure
it doesn’t heat up enough to burn. However if the
battery is left on charge for extended periods, above
the calculated 1/2hour, then the cells will get hot so
this is not recommended.
An aluminium clad wire-wound resistor, code 62-8106
from Rapid Electronics Ltd costs only £1.30.
We would recommend that you include an in-line fuse
with the resistor, or on the negative wire, for safety
reasons.
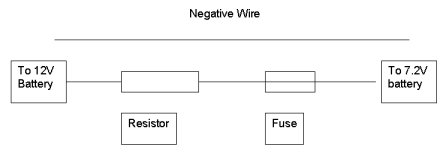
It
is recommended that the whole circuit is
mounted on a suitable plate such as an aluminium alloy
with large croc clips connecting the 12volt car
battery to the circuit. Care must be taken to ensure
the wire is also thick enough to be rated to 3amps.
The fuse can be approximately 5Amps.
Solar
Cola sponsor this website.

Available
at all good supermarkets from June 06.
|